Testing React Applications
Testing is often an overlooked part of the development process, while it's one of the most important. This post shows a few popular approaches to testing React applications.
Why is testing important?
The goal of testing is to check whether an application behaves as expected. It takes some time, but the outcome is usually much higher in the long term because of the bugs that tests are able to automatically catch. If you are working in the agile methodology it's especially important because even if you are one hundred percent sure that your service runs without unexpected behaviors, it may fail during the next development iteration.
Configuration
__
Tip: If you don't use the yarn package manager, just replace yarn add with npm install in the commands below.
Jest & React Testing Library
Both are essential parts of unit and integration tests. Jest is a test runner, which runs your code in an isolated environment outside of the browser. React Testing Library is a handy utility that adds APIs for working with React components.
They have been so widely used, that eventually were added to the official Create React App starter. Unfortunately, one of the most popular React frameworks - Next.js doesn't come with them out-of-the-box. In the step below I am going to guide you through the installation process for Next.js, if you already have them configured feel free to skip it.
Installation
Install necessary dependencies:
yarn add -D @testing-library/jest-dom @testing-library/react @testing-library/user-event babel-jest jest-css-modules jestLet's create a config directory and put all configuration files inside:
mkdir config
touch config/.babelrc
touch config/jest.config.js
touch config/jest.setup.js
Add jest-dom import statement to jest.setup.js:
config/jest.setup.js:
import "@testing-library/jest-dom";Then, configure Babel to work with Next.js. Put into .babelrc:
config/.babelrc:
{
  "presets": ["next/babel"]
}
And finish the Jest configuration by modifying jest.config.js:
config/jest.config.js:
module.exports = {
  rootDir: '../',
  setupFilesAfterEnv: ["./config/jest.setup.js"],
  transform: {
    '\\.js$': ['babel-jest', { configFile: './config/.babelrc' }]
  },
  moduleNameMapper: {
    "\\.(css|less|scss|sss|styl)$": "<rootDir>/node_modules/jest-css-modules"
  },
  verbose: true,
  collectCoverage: true,
  coveragePathIgnorePatterns: []
};
A quick explanation of the properties above is as follows:
rootDir- path to the root directorysetupFilesAfterEnv- imports scripts that will be used in teststransform- points to.babelrcfile and handles rules of syntax transformations including transpiling JSX into JSmoduleNameMapper- prevents parsing errors with CSS/SASS/LESS file importsverbose- makes the output more detailedcollectCoverage- calculates coverage, which is a percentage of code covered in tests. The higher the coverage, the more confident is your application.coveragePathIgnorePatterns- includes paths that shouldn't be taken into account when calculating coverage.
The last thing to do is add a script that starts Jest test runner to the package.json:
package.json:
diff --git a/package.json b/package.json
index 5e94bad..465c097 100644
--- a/package.json
+++ b/package.json
@@ -6,7 +6,8 @@
     "dev": "next dev",
     "build": "next build",
     "start": "next start",
-    "lint": "next lint"
+    "lint": "next lint",
+    "test": "jest --config ./config/jest.config.js"
   },
   "dependencies": {
     "@ant-design/icons": "^4.7.0",
Now, you should be able to run tests with npm run test or yarn test.
TypeScript support
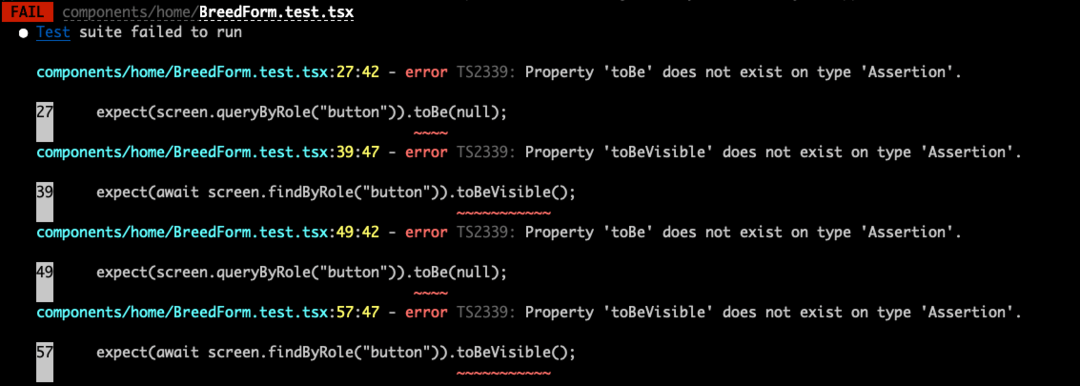
In order to import .tsx components from your test files, you need to install missing dependencies and add one line to transform in jest.config.ts.
yarn add -D @types/jest ts-jest ts-nodeconfig/jest.config.ts:
transform: {
  // ...
  "^.+\\.tsx?$": "ts-jest",
},
Cypress
When it comes to e2e tests, there are two most commonly used libraries: Cypress and Playwright. They offer very similar functionalities, but I've found Cypress to be a lot more beginner friendly and it has better integrations with other testing tools.
It runs your testing scenarios inside a browser, which means that you can easily test your application as a whole and from a real user's perspective. Cypress tests require having your development server running in the background, thankfully package named start-server-and-test does it automatically.
Configuration
Let's install dependencies:
yarn add cypress start-server-and-test --devNow open Cypress for the first time.
- yarn:
yarn run cypress open - npm:
npx cypress open
You should be guided through the configuration process. After it's done, you should have a configured folders structure used for e2e testing:
cypress/fixtures- mocked server responsescypress/e2e- our tests will be placed here. If you decide to createcypress/support- utility functions to be used in tests
Add scripts for controlling Cypress:
package.json:
diff --git a/package.json b/package.json
index 6c95f4f..02f3351 100644
--- a/package.json
+++ b/package.json
@@ -7,7 +7,11 @@
     "build": "next build",
     "start": "next start",
     "lint": "next lint",
-    "test": "jest --config ./config/jest.config.ts"
+    "test": "jest --config ./config/jest.config.ts",
+    "cy:open": "start-server-and-test dev 3000 cy:open-only",
+    "cy:open-only": "cypress open",
+    "cy:run": "start-server-and-test dev 3000 cy:run-only",
+    "cy:run-only": "cypress run"
   },
   "dependencies": {
     "@ant-design/icons": "^4.7.0",
I am running my development server with yarn dev, which starts it on port 3000. If you don't use this command or run it on another port you need to change the above scripts.
Feel free to get acquainted with the GUI, from which you can for example choose to fill your cypress/e2e folder with example test specs.
Integration with Testing Library
With Testing Library integrated, you can write the same queries as you have used in unit and integration tests to match specific components.
yarn add --dev cypress @testing-library/cypressAdd into cypress/support/commands.js:
cypress/support/commands.js:
import "@testing-library/cypress/add-commands";It automatically extends cy object:
cy.findByRole("button", { name: /Jackie Chan/i }).click();__
Warning: There's one difference between React Testing Library and Cypress integration: Only find* and findAll* query types are supported so keep that in mind while copying them from unit and integration tests.
TypeScript support
If you use TypeScript, you also need to put into tsconfig.json:
tsconfig.json:
{
  "compilerOptions": {
    "types": ["cypress", "@testing-library/cypress"]
  }
}
Troubleshooting with TypeScript
You may encounter an issue with Cypress overriding TypeScript configuration for unit tests.
The solution is to have two separate tsconfig.json files - one in the root directory, and a second which extends from the former and adds Cypress configuration.
You have to exclude cypress from the root's tsconfig.json:
tsconfig.json:
diff --git a/tsconfig.json b/tsconfig.json
index 977db06..0188279 100644
--- a/tsconfig.json
+++ b/tsconfig.json
@@ -18,7 +18,6 @@
     "isolatedModules": true,
     "jsx": "preserve",
     "incremental": true,
-    "types": ["cypress", "@testing-library/cypress"],
     "baseUrl": ".",
   },
   "include": [
@@ -27,6 +26,9 @@
     "**/*.tsx"
   ],
   "exclude": [
+    "cypress",
+    "cypress.config.ts",
+    "cypress/**/*.cy.ts",
     "node_modules"
   ]
And create a new one in cypress/tsconfig.json:
cypress/tsconfig.json:
{
  "extends": "../tsconfig.json",
  "compilerOptions": {
    "types": ["cypress", "@testing-library/cypress"]
  }
}
Structuring tests
Unit and integration tests
After installing Jest and React Testing Library, you probably want to create your first tests, but may not have any idea how to structure them. One popular way is to have a test directory with reflected components directories inside, it probably will feel the most natural for people experienced with testing in Java.
/
/tests
  /components
    Form.test.js
/components
  Form.js
The second way is placing tests alongside tested components, for example, if you have a component named Form.js, the test for it named Form.test.js should be placed in the same directory.
/components
  Form.js
  Form.test.js
End-to-End
Cypress encourages you to put all your tests inside /cypress/e2e. They are run one by one in alphabetical order within the same directory, when a folder is encountered Cypress continues traversing deeper and goes back up after it's fully visited.
Unit tests
In this tutorial, we will be testing a simple web application that allows browsing images of cats of a given breed.
You can visit live deploy or clone a git repo to run all tests on your own machine:
git clone https://github.com/curiosum-dev/cat-as-a-service.gitButton Show me cats should be rendered after any item has been selected. Let's check if this functionality works properly.
components/home/BreedForm.test.jsx:
import React from "react";
import { render, screen } from "@testing-library/react";
import userEvent from "@testing-library/user-event";
import { BreedForm } from "./BreedForm";

const breeds = [
  { id: "abys", name: "Abyssinian" },
  { id: "aege", name: "Aegean" },
  { id: "abob", name: "American Bobtail" },
  { id: "acur", name: "American Curl" },
];

describe("BreedForm", () => {
  it("button isn't visible by default", async () => {
    render(<BreedForm breeds={breeds} />);

    expect(screen.queryByRole("button")).toBe(null);
  });

  it("button is visible after selecting list item", async () => {
    render(<BreedForm breeds={breeds} />);
    const user = userEvent.setup();

    user.selectOptions(screen.getByPlaceholderText("Select a breed"), [
      "Abyssinian",
    ]);

    expect(await screen.findByRole("button")).toBeVisible();
  });
});
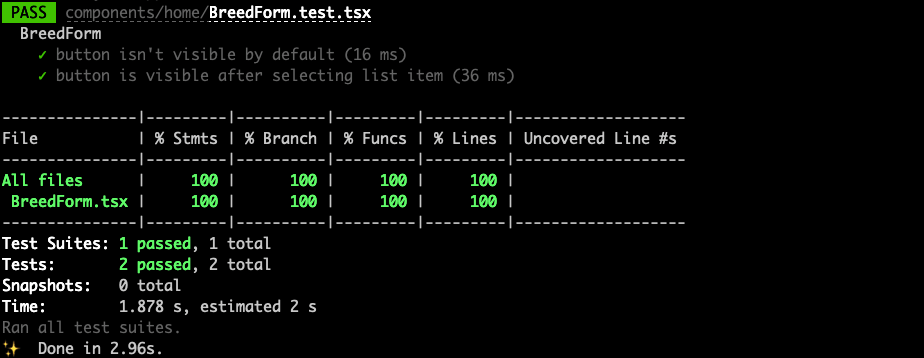
Let's run it with yarn test:
Success! But what is exactly going on there?
Function describe groups your tests into a test suite. Inside its callback, besides test cases, you can use setup and teardown functions to execute code before or after tests run, for example, to mock network requests for all tests.
Function render, you guessed it... renders your React component.
This element isn't rendered in the browser but in an isolated Node.js environment. One of the most popular is JSDOM which has a pure-JavaScript implementation of many web standards and APIs.
Object screen contains queries allowing you to get a reference to a specific element, and user has methods to imitate a user's interaction with it.
Queries
There are three types of queries, which names start with getBy..., findBy... and queryBy....
queryBy... returns null when doesn't find an element, the rest throws an error. findBy... is the only one asynchronous, which means that it returns a Promise and waits with resolving it until it finds the element or 1000ms timeout runs out. It's especially useful when you use a library like Formik, which may not render UI elements in the first render of the component.
Query prioritization
It's recommended to prioritize your queries for accessibility first, which means that you should more often use getByRole, getByLabelText, or even getByText instead of getByTestId. A user cannot see the id, and using this query is recommended only for cases where you can't match by role or by text. The full list of available queries can be found here or in the cheat sheet.
Checking the results
The last part of my unit tests has an expect invocation. This function is part of Jest and allows you to construct variable checks using available matchers. React Testing Library extends them by adding its own matchers created exclusively for React components, for example .toBeVisible().
Test cases pass by default unless any matcher fails.
Arrange-Act-Assert
As you could notice, unit tests usually follow the arrange-act-assert pattern:
- arrange - initial configuration. Usually rendering components, setting up
userEvent, and mocking network requests. - act - Interaction with the application, like typing or clicking on buttons.
- assert - Asserting if achieved the desired effect.
It's a de facto standard to structure your unit tests this way because it clearly separates what is being tested from the setup and verification phase. It also enforces keeping unit tests minimalistic and helps find smelling code, for example in a situation when you need to mix together multiple acts with assertions for some reason.
Integration tests
There is some disagreement in the community about what integration tests are. The most commonly used definition says that it tests multiple components or functionalities at once. They don't follow the arrange-act-assert pattern, instead, they have multiple actions followed by assertions. We could refactor our previous unit tests and create a single integration test:
components/home/BreedForm.test.jsx:
it("button becomes visible after selecting list item", async () => {
  render(<BreedForm breeds={breeds} />);
  const user = userEvent.setup();

  expect(screen.queryByRole("button")).toBe(null);

  user.selectOptions(screen.getByPlaceholderText("Select a breed"), [
    "Abyssinian",
  ]);

  expect(await screen.findByRole("button")).toBeVisible();
});
You may ask, when should I write integration tests instead of unit tests? They should be used in every situation where you can resemble the realistic human actions flow. For example, a user may search for something in the shop's search bar, then click on a found element and add it to the shopping cart. Instead of writing multiple unit tests, we could write a single integration test that consists of them.
Test-Drive-Development
Test-driven development (TDD) is a programming discipline in which you write a test for each functionality or component before the actual implementation. Following this discipline makes your code cleaner because you need to think through ins and outs before writing it. It's proved that it leads to 40%-80% reductions in bug density than without any tests, but it makes the programming process a bit longer for newcomers that need to figure out how to test various components.
Mocking data
It's good to reduce side effects to keep your tests reliable. Think about such a scenario: your tested component gathers info about the current weather from an external API. In most cases it should pass, but what if the service is temporarily unavailable or due to a slow internet connection test's time for execution limit is exceeded?
Because of these issues, you should mock your network requests with random data, either statically generated ones or using a fake data generator like Faker.
Mocking network data
An HTTP server can be mocked with Nock.
An example looks as follows:
nock("http://localhost:3000")
  .get("/api/breeds")
  .reply(200, [
    { id: "abys", name: "Abyssinian" },
    { id: "aege", name: "Aegean" },
    { id: "abob", name: "American Bobtail" },
    { id: "acur", name: "American Curl" },
  ]);
If a tested component contains a fetch call, it's resolved with the fake data:
fetch("/api/breeds")
  .then((response) => response.json())
  .then((breeds) => console.log(breeds));

/**
 * Output:
 [
    { id: "abys", name: "Abyssinian" },
    { id: "aege", name: "Aegean" },
    { id: "abob", name: "American Bobtail" },
    { id: "acur", name: "American Curl" },
  ]
  **/
Mocking components
Sometimes it's necessary to mock components from other libraries.
One situation is when they have weird behavior, for example, render in document.body instead of in parent component which makes them uncatchable by queries.
It's exactly the situation I've encountered while working with Ant Designs <Select /> and <Select.Option /> components.
Fortunately, Jest provides the mock method:
config/jest.setup.js:
jest.mock("antd", () => {
  const antd = jest.requireActual("antd");

  const Select = ({ children, onChange, placeholder }) => {
    return (
      <select
        onChange={(e) => onChange(e.target.value)}
        placeholder={placeholder}
      >
        {children}
      </select>
    );
  };

  // eslint-disable-next-line react/display-name
  Select.Option = ({ children, ...otherProps }) => {
    return <option {...otherProps}>{children}</option>;
  };

  return {
    ...antd,
    Select,
  };
});
The code above should be placed in jest.setup.js. From now, every time you import { Select } from "antd", it imports your custom component.
You may also need to mock state-of-the-art JavaScript functions that your components use and are not already implemented in JSDOM, for example window.matchMedia .
E2E tests
Let's make sure that after selecting a breed and clicking the submit button browser was redirected to a page with cats:
cypress/e2e/0-cat-as-a-service/landing.cy.js:
describe("Landing page", () => {
  it("Goes to cats of a specific breed page", () => {
    cy.visit("http://localhost:3000");

    cy.findByRole("combobox").click();

    cy.findByText("Abyssinian").click();

    cy.findByRole("button").click();

    cy.findAllByAltText("cat image").should("be.visible");
  });
});
We can also verify the functionality of the breed's page individually:
cypress/e2e/0-cat-as-a-service/breed.cy.js:
describe("Cat's breed page", () => {
  it("Shows page with cats of a specific breed", () => {
    cy.visit("http://localhost:3000/breed/abys");

    cy.findAllByAltText("cat image").should("exist");
  });

  it("Shows 404 when cat's breed is unknown", () => {
    cy.visit("http://localhost:3000/breed/wrong_breed_name");

    cy.findAllByAltText("cat image").should("not.exist");

    cy.findByText("404").should("exist");
  });
});
Now run new e2e tests:
yarn cy:runAfter running them, you may notice that cypress/videos folder has been created. It contains records of performed operations within a browser, in case some tests haven't succeeded and you would like to check why.
Resetting migrations on the back-end server
While running e2e tests you shouldn't be mocking requests to your back-end development server, rather make sure that the initial state is consistent. One way to achieve it is to create an API on your back-end server, available only during development, which resets migrations or creates specific records in the database. Before Cypress tests are executed you should make an HTTP request to that API endpoint.
Create a new file in the folder cypress/support with a beforehook:
cypress/support/reset-migrations.js:
before(() => {
  cy.request("http://dev.local/e2e");
});
It runs once before all tests. The implementation details of the back-end endpoint are up to you.
Summary
Testing is a broad subject and it’s impossible to cover it thoroughly in a single blog post. This tutorial was made to give you a rough idea about common concepts and where to start further research if you would like to learn a certain topic better.
FAQ
Why is testing important in React applications?
Testing ensures that React applications behave as expected, catching bugs automatically, which is crucial especially in agile methodologies.
What are the key tools for testing React applications?
Jest, as a test runner, and React Testing Library for unit and integration tests, are essential tools widely used in React application testing.
How can you set up testing configurations for React and Next.js applications?
Set up involves installing necessary dependencies, configuring Babel for Next.js, and adjusting Jest settings to work with your React application.
What are the advantages of using Cypress for end-to-end testing in React?
Cypress is beginner-friendly and integrates well with other testing tools, providing a realistic testing environment by running scenarios in a browser.
How can TypeScript be supported in React application testing?
Install required TypeScript dependencies and update Jest configuration to handle .tsx files.
What are the best practices for structuring React application tests?
Tests can be structured by placing them alongside their respective components or within a separate tests directory, following a clear and organized pattern.
How does the Arrange-Act-Assert pattern benefit React testing?
This pattern helps in structuring unit tests clearly, separating setup, interaction, and verification phases, making tests easier to understand and maintain.
Why is mocking data important in React testing?
Mocking reduces side effects, ensuring reliability of tests by providing consistent responses and data, especially when dealing with external APIs or components.
What are the differences between unit, integration, and end-to-end tests in React?
Unit tests focus on single components, integration tests cover multiple components or functionalities, and end-to-end tests validate the entire application flow from a user's perspective.

 17 min read
 14 Mar 2024 (created at 14 Sep 2022)


